Liquid yeast is perfect to be reused. To JasperYeast customers, we offer a 5 gallon stainless steel brink for $150. This brink enables you to store and feed your yeast in an easy and sanitary way. The brink comes with tri-clamp connectors, but for a small amount extra it is possible to add DIN adapters. In this leaflet we explain how to use the brink. Check out this video https://youtu.be/0gBTQ9aL3CE for a video tutorial of the process outlined below.
If you want to reuse yeast the quality/viability of the cells has to be good. Make sure that the pH of the finished beer is not too high (definitely below 4.7) and not rising. The flavor has to be right, as well as the fermentation rate of the beer you are harvesting from. Your diacetyl-rest should have (mostly) finished.
Most yeast strains flocculate better at lower temperatures, for most a temperature below 8 °C works. A little head-pressure with CO2 helps with flocculation.
Make sure that your brink is clean and filled with sanitizer. Connect the bottom of the tank that contains the yeast to the brink as shown below. Use rubber gloves and make sure everything is clean and sterile. Having a spray bottle with isopropyl alcohol at hand is handy. Run hot water through a pump to the cross connector, through the brew-hose, via a sight-glass and a T-piece back to the hot water kettle (temperature has to be 80°C or above, see Fig 1.) Do this for 15 minutes. Close all the valves and turn the pump off, leaving everything for about one hour to cool.
Figure 1. Rinsing the system with hot liquor (hot water) for pasteurization
After an hour, slowly let the sanitizer solution flow from the brink to the outlet close to the fermentation vessel. Empty the brink completely (Fig 2). You can carefully open the connector on the top, and cover this with some tin foil (that has been sterilized with alcohol) to not pull a vacuum. When the brink is empty, close all the valves. The Hot water return can be decoupled when the temperature has cooled a little.
Figure 2. Emptying out the sanitizer.
Now we need to dump out trub from the fermentation vessel. Open the dumping valve that you used to run the sanitizer through, and carefully and slowly open the valve on the bottom of the fermentation vessel (Fig. 3). This way you can drain out the brown dead cells/trub into the waste. Most of the time you do not need to open the valves fully to have it come out. Be gentle. As soon as you see the yeast turn creamy/custardy, close the valves immediately.
FIGURE 3. DUMPING TRUB/DEAD AND PREMATURELY FLOCCULATED CELLS
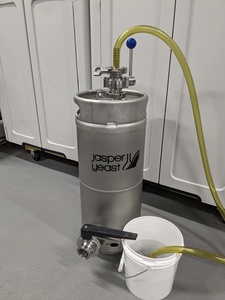
Now it is time to move the yeast to the brink. Open the valves from the fermentation tank to the brink (Fig. 4). You could, if there is still liquid in the hose, empty this out via the valve close to the brink. Fill the brink slowly to prevent channeling in your cone of yeast. Tip: Put the brink on a scale. This will indicate the exact amount (in weight) of yeast collected.
FIGURE 4. FILING BRINK
When done, close all the valves. You can rinse all the hoses and parts with hot water right away to clean them out (Figure 5). Put a barb on the top of the brink with a hose on it and hang this open ended in a bucket of water (not shown). CO2 can be released this way and pressure buildup prevented. Store the yeast cold.
FIGURE 5. RISING OUT HOSES AND PARTS
Stay in the know
Sign up for our newsletter now and hop into the world of brewing excellence.